BlackPearl 3.0 New Features Part 2: Access Control Lists

In Part 1 of my BlackPearl 3.0 blog post, I discussed the new storage mediums and data policies that can be used with BlackPearl. Today I focus on another new feature of BlackPearl 3.0, Access Control Lists (ACLs). As the name implies, with ACLs you will be able to control what type of access users and applications have to the data in BlackPearl.

The concept of ACLs is not new. Amazon has been using ACLs with its public cloud storage for some time. BlackPearl’s ACL features are very similar, but not identical, to Amazon’s ACLs. These differences are due to the nature of a private cloud (BlackPearl) versus a public cloud system.

ACLs and Buckets

In BlackPearl, ACLs are primarily used to control permissions on objects in buckets, which is a top-level container in BlackPearl. Bucket permissions can be granted to a user or a group.

Groups are a new feature in BlackPearl 3.0, and can consist of users and other groups. Groups can be managed on the Users page in the web management interface. BlackPearl 3.0 ships with two default groups, “Everyone” and “Administrators”, and more groups can be created.

The following permission(s) can be granted to a user or group on a bucket:

  • List – List all objects in a bucket
  • Read – Download (GET) objects from a bucket
  • Write – Upload (PUT) objects to a bucket
  • Delete – Delete objects from a bucket
  • Job – Modify or cancel jobs associated with the bucket, even if the job wasn’t created by that user or group
  • Owner – Full control of bucket. Includes all permissions above. By default the user that creates the bucket is given Owner permissions on that bucket

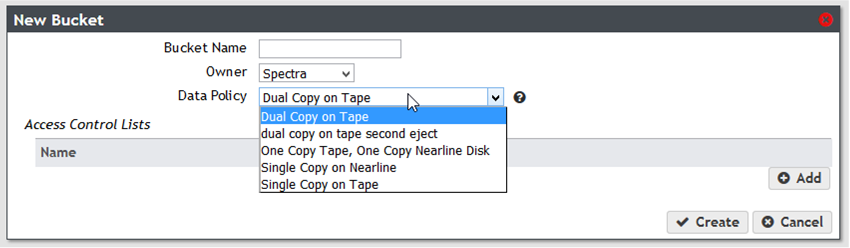
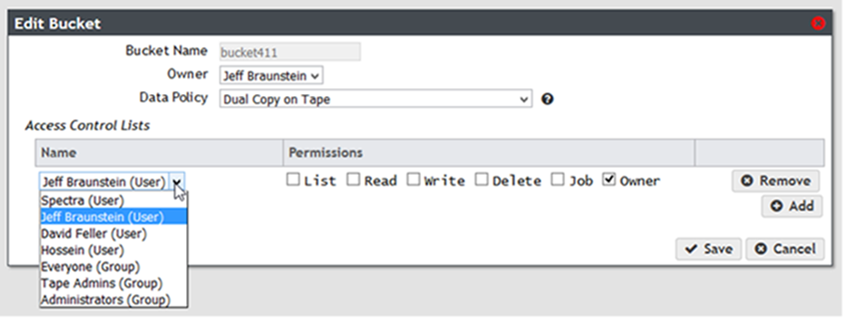
When a bucket is created or edited in the web management interface, ACLs can be set on the bucket as shown in the first image below. A typical use case might be that you want to give full access to a bucket to certain users and only read access to other users. In this case you could create a “Full Access” group and set an ACL giving that group “Owner” permissions on the bucket. You could then create another group called “Read Only Access” and set an ACL giving that group “List” and “Read” permissions.

editBucketBlogPostNov2015

Global Permissions

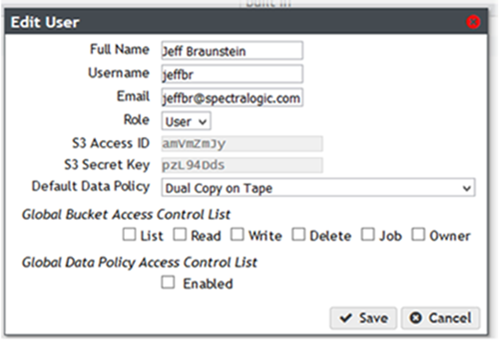
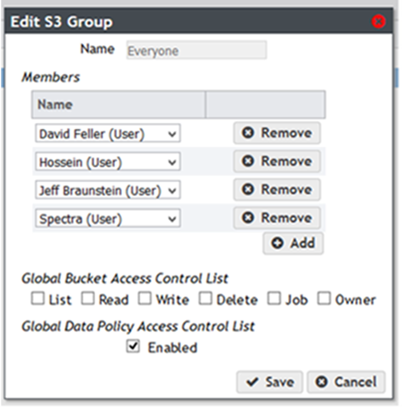
Users and groups can be granted “Global” ACLs on all buckets. So for example, a user or group could be given “Read” permission on all objects in all buckets in BlackPearl. These settings are controlled in the “Global Bucket Access Control List” in the User and Group settings as shown in the two images below.

editUserBlogPostNov2015

editGroupBlogPostNov2015

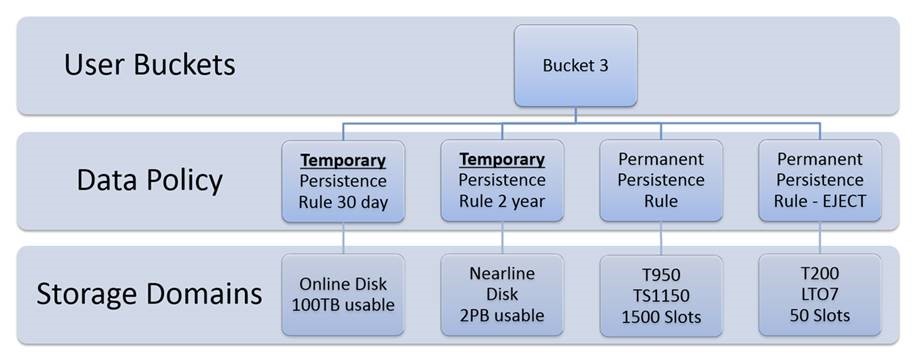
ACLs and Data Policies

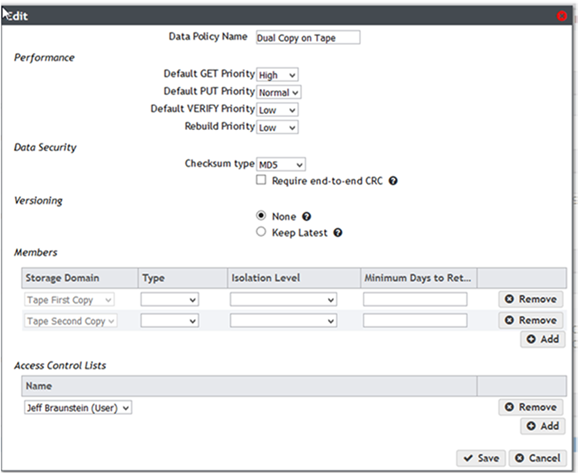
As mentioned Part 1 of this blog post, data policies can be set on buckets that control how many copies of the objects are kept on each storage medium and for how long. In some cases, you may only want certain users to have access to use certain data policies when creating a bucket. BlackPearl allows you to set ACLs on data policies that allow you to control this access. BlackPearl 3.0 includes a built-in “Everyone” group, and members of this group by default have global permissions to use all data policies as shown by the checked box in the image above. This means that by default all users can access all data policies. However, administrators can remove this setting and only let certain users access certain data policies, as shown below.

editPolicyBlogPostNov2015

ACLs in the API and SDKs

All the ACL settings that are available in the web management interface, as shown in the screens above, can also be controlled using the BlackPearl API and SDKs. So for example, not only can a bucket be programmatically created, but the ACLs on the bucket can also be programmatically set.

Coming Up Next

In my next blog post, I’ll talk about how developers will be able to use the new BlackPearl 3.0 features via the API and SDKs. I’ll also explain how developers that have are already built or in the process of building clients can prepare to migrate to BlackPearl 3.0.


BlackPearl 3.0 New Features Part 1: ArcticBlue and Advanced Bucket Management

On October 15, 2015, Spectra Logic announced ArcticBlue, new nearline disk solution that sits behind the BlackPearl Deep Storage Gateway. BlackPearl now provides an S3 object private cloud interface to the following storage products:

  • Spectra Logic tape libraries – BlackPearl has supported archive to tape libraries since its original release
  • ArcticBlue – ArcticBlue is a new nearline storage target for BlackPearl. Read more about ArcticBlue
  • Spectra Online Disk – Spectra Online Disk with Enterprise SAS drives are also a new storage target for BlackPearl

As part of the ArcticBlue release in December, we will also be releasing the next major software version of BlackPearl, Version 3.0 (we are skipping 2.0 to get BlackPearl and Verde on a common code base release). This new version will not only include support for ArcticBlue and Spectra Online Disk, but also includes two other new major features:

  • Advanced Bucket Management – Allows data policies to be set on buckets to control how many copies and for how long objects are stored on each storage product listed above. Advanced Bucket Management is covered below.
  • Access Control Lists – Provides sophisticated permission control on objects and buckets. Access Control Lists will be covered in Part 2 of this blog post.

Advanced Bucket Management

Advanced Bucket Management (ABM) is an extremely powerful new feature provided at no additional cost in BlackPearl Version 3.0. Policies are set on buckets that determine which storage type each object in the bucket will be stored on and for how long each object will be stored on each storage type. You can see an example scenario in the diagram below. Though this is probably not a realistic scenario, it does show all the different policy options.

ABMExample

In the diagram above, Bucket 3 has a 4-copy data policy. When objects are moved to Bucket 3, a copy of the object is immediately placed in each of the four storage domains:

  • A copy will be placed on online disk for 30 days for very fast object retrieval.
  • A copy will be placed on ArcticBlue nearline disk for 2 years for fairly fast object retrieval (ArcticBlue is “power down” disk so it takes a bit longer to respond than online disk).
  • A copy will be placed in a Spectra T950 tape library with TS1150 tape drives. This copy has no expiration.
  • A copy will be placed in a Spectra T200 tape library with LTO-7 tape drives. The tapes on which this object is stored will be ejected from the library for offsite storage.

When an object stored in Bucket 3 is requested by an application, the BlackPearl knows to retrieve it from the fastest available storage domain. So if the object is being requested within the first 30 days, it will be retrieved from online staging disk. Between 31 days and 2 years, the object will be retrieved from ArcticBlue nearline disk. And after two years the object will be retrieved from tape.

When a bucket is created, it must now be assigned a data policy. In the web management interface you will be forced to choose a data policy (see below). If you create a bucket via the API/SDK, you can also assign a data policy. But if you don’t assign a data policy, the user’s default data policy will be assigned to the bucket.

NOTE: If you are upgrading from 1.x to 3.0, you will need to assign a default data policy for each user.

newBucketScreenABM

BlackPearl will ship with a number of common data policies, as shown on the screen image above. These policies are automatically created based on the hardware attached. If only tape is attached then two tape policies will be auto generated and will work for most users. However, users can create their own data policies as well. Developers will be able to manipulate nearly all aspects of data policy management via the API and SDKs. We will be providing documentation on how to do this as we get closer to the release date of BlackPearl 3.0 in December.

To support Advanced Bucket Management at the most basic level in a BlackPearl client, the client should support the ability to use multiple buckets. Having multiple buckets, as shown above, will allow for the user to choose different data policies. One policy for frequently accessed data could have one copy in Spectra Online Disk for 120 days and one copy in ArcticBlue Nearline Disk forever. A second policy could be the “One Copy Tape, One Copy Nearline Disk” which is two permanent copies, great for warm data that needs parallel access while providing genetic diversity with extremely high level of durability. This would provide users two different types of storage profiles within one platform.

You can learn more about the new features of BlackPearl by viewing the recording of our inaugural Developer Summit.

In Part 2 of this blog post, I will describe the new Access Control Lists (ACLs) feature.


New Python, C SDK Releases

We have recently posted new releases of our Python and C Software Development Kits on GitHub. Get them from our Downloads page. We have also posted new Python code samples, documentation, and installation instructions. Check out this additional Python information on our Documentation page.


BlackPearl and Checksums

Spectra Logic’s highest priority is protecting our customers’ data. BlackPearl and the tape libraries that sit behind it have a number of features to ensure that your data stays protected. We start data integrity as soon as data is ingested by BlackPearl. Client applications sending data to BlackPearl can pass in a checksum to ensure that the data arrives safely. A checksum acts as a fingerprint for the file and can be used to make sure that the file received by BlackPearl is the same file that the client thought it sent. BlackPearl accepts MD-5, CRC-32, CRC-32C, SHA-256, or SHA-512 checksums. The client provides the checksum type and value in the header of the API PUT operation:

Content-MD5: 37r//gvw/aB3GmilbcUJpg==

A checksum can also be performed using our C, C#/.NET, and Java Software Development Kits.

BlackPearl uses the checksum provided for each file to ensure that the file it received is the same as the file the client sent. If the checksum does not match correctly with the file that was received, BlackPearl will return an error (400 – bad digest) to the client. If the client does not pass in a checksum with the file, BlackPearl will automatically create a checksum for the file. By default this checksum type will be MD-5, though the checksum type can be changed on the data policy settings on the bucket (a bucket is a top-level container for objects/files in BlackPearl). BlackPearl then stores the checksum, whether generated by the client or BlackPearl itself, both in its object database and with the file on tape.

Once stored by BlackPearl, the checksum can be used internally to make sure the file is still valid when it is recalled back from tape. BlackPearl will automatically do a checksum if the file is requested by a client (GET) and the file must come from tape. The checksum is done both as the file is coming from tape and after it has landed on the BlackPearl cache. BlackPearl will also provide the checksum value to the client so that the client can verify that it successfully received the file as well.

In some cases, when using the Bulk PUT operations, the client may be required to break the object into multiple “blobs” to upload it to BlackPearl. In this case, a checksum will be used for each blob uploaded to BlackPearl. The same is true when using Multi-Part Upload – each part of the file will have its own checksum. BlackPearl also supports Partial-File Restore, which is the ability to restore (GET) part of a file. With Partial-File Restore, a client can specify, for example, that it wants to retrieve the first 2GB of a 10GB file. In order to perform a checksum in this case, BlackPearl must first retrieve the entire file (or chunk) from tape. Once BlackPearl has completed the checksum on the file or chunk, it can send the partial file to the client.

Because BlackPearl may not always calculate the checksum for an entire file (because it may be broken up into multiple pieces), developers may want to have their clients calculate the entire file checksum itself. This value could then be stored in the file’s metadata when uploaded to BlackPearl. When the file is later retrieved, the client could calculate the checksum again and compare the values.


Inaugural BlackPearl Developer Summit

Tuesday, October 20, 2015 9:00 AM Mountain Time (15:00 UTC), WebEx
Join us for Spectra Logic’s inaugural BlackPearl Developer Summit, a virtual conference for current and potential Spectra Logic developers. You’ll get product updates from our CEO and BlackPearl product manager, and you will learn how these new features will help customers and developers. You will learn how to build a Spectra S3 client for BlackPearl, our private cloud gateway to our tape and disk storage systems. You will see how one of our partners developed a client and watch it in action. And you will get to ask questions to our BlackPearl Engineering team. Don’t miss it! Learn more and register at spectralogic.com/developerconference


BlackPearl 1.2 to Be Released This Week

BlackPearl software version 1.2 will be released later this week and should start showing up as an update option in the BlackPearl management web interface next week. The 1.2 update includes enhancements to the BlackPearl management web interface, support for new features in our Deep Storage Browser (formerly DS3 Browser) release version 1.2.1, and a number of bug fixes.

To prepare for this release, we have updated the BlackPearl Simulator to Version 1.2 so you can test out this latest code. The Deep Storage Browser version 1.2.1 is now also available for download.

DSB1.2screen
The Deep Storage Browser is our simple drag-and-drop, FTP-like client for BlackPearl. The new 1.2.1 version of this free, open-source Spectra S3 client has a number of improvements, including:

  • Search for objects on BlackPearl, including with wildcards -- percent (%) or underscore (_), like SQL
  • Upload/download with arrow/click icons
  • Dragging a directory from BlackPearl to local machine no longer results in parent directory also being brought over
  • Logging
  • Folder delete on BlackPearl
  • Multi file delete on BlackPearl

These are the features that were most requested by our users. If you have any other ideas to improve the Deep Storage Browser, please Contact Us or use our Google Group.

We hope you like the new versions of BlackPearl and the Deep Storage Browser.


Demo: Building a Spectra S3 BlackPearl Client Application

I have created a new video that shows how to create a demo Windows desktop BlackPearl client application using our .NET/C# Software Development Kit (SDK). Anybody can create this client in less than 15 minutes. You do not need an actual BlackPearl gateway, you can use our BlackPearl simulator. And all the other tools you need are free to download. Give it a try.

Here’s the final Visual Studio project files for the demo client that we build.


BlackPearl Spectra S3 Job Priority

BlackPearl acts as a caching gateway in front of Spectra Logic’s tape libraries. Typical client applications will both send groups of files to (PUT) and request groups of files from (GET) BlackPearl. BlackPearl uses “Jobs” to contain and keep track of these individual input/output operations.

BlackPearl is capable of managing many jobs at once. Jobs have a selectable “Priority” for processing the job so that client applications can have some control over the resources assigned to each job. The job priority settings are only relevant when the cache or tape drive resources are constrained, in which case the BlackPearl is said to be “throttled”. If there are no resource constraints, then all jobs will be processed equally.

Files moved by a job are broken into one or more “chunks” for processing. Cache space is required to store each chunk. The job priority determines how many chunks a job can use at any one time. The more chunk cache spaces that are available for a job, the more chunks that can be uploaded or downloaded by the job at any one time. Job priority can also affect how many tape drives a job can utilize at any one time. It takes at least two chunks to efficiently and continuously feed a tape drive.

Job Priority Values & Chunk Allocation

Jobs can be set by client applications to have one of the following priority. For chunk allocation, these priorities are only applicable if the BlackPearl is throttled.

  • Low – Low priority jobs get a maximum of four chunk cache spaces at any one time.
  • Normal -- (default for PUT) Normal priority jobs get a maximum chunk cache space at any one time of either: (a) eight or (b) two times the number of tape drives, whichever is greater.
  • High -- (default for GET) High priority jobs get a maximum chunk cache space at any one time of either: (a) sixteen or (b) three times the number of tape drives, whichever is greater.
  • Urgent – Urgent priority jobs get special prioritization. An Urgent job is exempt from any maximum limitations. It can use all available chunk cache space that it requests.

When jobs are requesting cache space for their chunks, and there are only a limited number of spaces available, the job that asks for the spaces first will get them, but no more than the maximums described above.

BlackPearl can also create its own system jobs with Critical and Background priority. These priority values are not available for jobs created by client applications, but you may see them on the Jobs Status Screen on the BlackPearl web interface.

  • Critical – The job must be executed immediately and cannot wait. This is typically used for tape drive cleaning operations.
  • Background – The job can be done when resources are available. This is typically used for tape inspection and reclamation.

Prioritization for Tape Read/Write Operations

The prioritization for tape drive read and write operations for chunks works in this order of preference:

  1. Is the priority of the chunk “Urgent”? If yes, goes before all others (this prioritization preference introduced BlackPearl 3.3)
  2. Can the chunk use a tape that’s already in a drive? If yes, it goes before a chunk that can’t.
  3. Is the chunk’s priority higher (excluding Urgent priority)? If yes, it goes before lower priority chunks.
  4. Can the chunk proceed without allocating another tape to itself? If yes, it goes before chunks requiring another tape.
  5. Has the chunk been waiting longer in queue? If yes, it goes before newer chunks.

Note that no job, not even an Urgent priority job, can stop or kill other active tape read or write operations.

Other Ways to Improve Job Performance

If the goal is to improve performance on a PUT operation, then the job’s Write Optimization can be set to “Performance” instead of the default “Capacity”. Using performance means that the job data may be written to more tapes simultaneously, which will allow for faster write performance.

The BlackPearl cache can also be set to its “Performance” configuration rather than its default “Capacity” configuration. This will significantly improve the performance for all jobs. See the “Configure the Cache” section of the BlackPearl User Guide.